インストールするPC
Windows11がインストールできない古いノートPCにLinuxをインストールしました。
.jpg)
もとはWindows7が入っていた機種です。Windows10はインストールできたのでそのまま使っていました。
HWiNFO64によるシステム概要

Memory: DDR3 4GB
SSD: 480GB
Ubuntu Server 20.04 LTSのインストール
最新版のLTSは22.10ですが、情報が多い20.04をインストールします。
Ubuntu Server 20.04 LTSを入手
Alternative Downloads
Get Ubuntu Server 20.04 LTS
UbuntuのUSBインストールメディアを作成
WidnowsではRufusを使ってUSBメモリにインストーラーを書き込む
Ubuntuのインストール
PC(BIOS/UEFI)のBOOTセレクタでUSBドライブを選択して起動
- Langage→English
- Installer update→Continue without updating
- Keyboard→English(US) Valiant→English(US)
- Network→有線LANがつながっていることを確認
- Proxy→(空欄のまま)Done
- Mirror address→デフォルト(http://jp.archive.ubuntu.com/ubuntu)→Done
- Guided storage configuration→(X) Use an entire disk [X] Setup up this disk as na LVM group→Done
- Storage configuration→Done
- Confirm destructive action→Continue ※ディスクは初期化される
- Profile→適宜入力→Done
- SSH Setup→Install OpenSSH Server→Done
- Featured Saver Snaps→何も選択しない→Done

Open SSH serverのインストール
Open SSHがインストールされていない場合はaptでinstallする。
$ sudo apt update$ sudo apt install openssh-server
OpenSSH Serverが起動していることを確認
$ systemctl status ssh
起動していない場合
$ sudo systemctl enable ssh$ sudo systemctl start ssh
以上で、パスワード認証でSSH接続可能になる。
諸設定・確認
ノートPCの蓋を閉じたときにスリープしなくする。
logind.confを編集
$ sudo nano /etc/systemd/logind.conf
一行追加
HandleLidSwitch=ignore
サービスを再起動
$ sudo systemctl restart systemd-logind.service
現在起動しているサービスの一覧を表示 ([--all]で全サービス)
$ systemctl -t service
サービスの起動設定の一覧を表示
$ systemctl list-unit-files -t service
ubuntuバージョン確認
$ cat /etc/issue
$ cat /etc/os-release (詳細)
IPアドレス確認
$ hostname -I
$ ip a
ifconfigはnet-toolsをインストールすると利用できる
$ sudo apt update$ sudo apt upgrade$ sudo apt install net-tools
IPアドレス、ポート確認
$ netstat -atuw
-a 待ち受け(LISTEN)ポートも表示-t TCP-u UDP-w ICP・RAW
ディスク使用量確認
$ df -h --total
物理ディスクを確認
$ sudo fdisk -l
aptコマンド
※aptとapt-getがあるがaptを使う
パッケージ一覧を更新
$ sudo apt update
パッケージを更新
$ sudo apt upgrade
パッケージをインストール
$ sudo apt install <パッケージ名>
パッケージをアンインストール
$ sudo apt remove <パッケージ名>
パッケージを完全削除(設定ファイルを含む)
$ sudo apt purge <パッケージ名>
$ sudo apt remove --purge <パッケージ名>
不要なパッケージをまとめてアンイストール
$ sudo apt autoremove
ファイル名からパッケージを探す(部分一致)
$ apt search <パッケージ名>
$dpkg -l | grep <パッケージ名>
パッケージの詳細情報を表示
$ apt show <パッケージ名>
ファイアーウォールの設定
学習のためファイアーウォールが無効化されているのを確認
$ sudo ufw statusStatus: inactive
LAMPのインストール
taskselをインストール
$ sudo apt update$ sudo apt upgrade$ sudo apt install tasksel
taskselでLAMPをインストール
$ sudo tasksel
taskselをオプション無しで起動→メニュー画面
LAMP serverを選択しインストール

※Ubuntuの非Server版はtaskselのメニュー項目が異なるようです
Apache2の確認
$ apache2 -vServer version: Apache/2.4.41 (Ubuntu)Server built: 2023-01-23T18:36:09
$ service apache2 status● apache2.service - The Apache HTTP ServerLoaded: loaded (/lib/systemd/system/apache2.service; enabled; vendor preset: enabled)Active: active (running) since Wed 2023-02-15 11:39:13 UTC; 24h agoDocs: https://httpd.apache.org/docs/2.4/Main PID: 30837 (apache2)Tasks: 11 (limit: 4494)Memory: 59.4MCGroup: /system.slice/apache2.service├─30837 /usr/sbin/apache2 -k start├─30839 /usr/sbin/apache2 -k start├─30840 /usr/sbin/apache2 -k start├─30841 /usr/sbin/apache2 -k start├─30842 /usr/sbin/apache2 -k start├─30845 /usr/sbin/apache2 -k start├─30846 /usr/sbin/apache2 -k start├─30847 /usr/sbin/apache2 -k start├─30851 /usr/sbin/apache2 -k start├─30852 /usr/sbin/apache2 -k start└─30875 /usr/sbin/apache2 -k startFeb 15 11:39:13 dynabook systemd[1]: Starting The Apache HTTP Server...Feb 15 11:39:13 dynabook apachectl[30835]: [Wed Feb 15 11:39:13.223689 2023] [alias:warn] [pid 30835] AH00671: The Alias direc>Feb 15 11:39:13 dynabook apachectl[30835]: AH00558: apache2: Could not reliably determine the server's fully qualified domain >Feb 15 11:39:13 dynabook systemd[1]: Started The Apache HTTP Server.
IPアドレス確認
$ hostname -I
ブラウザから確認
http://<IPアドレス>:80

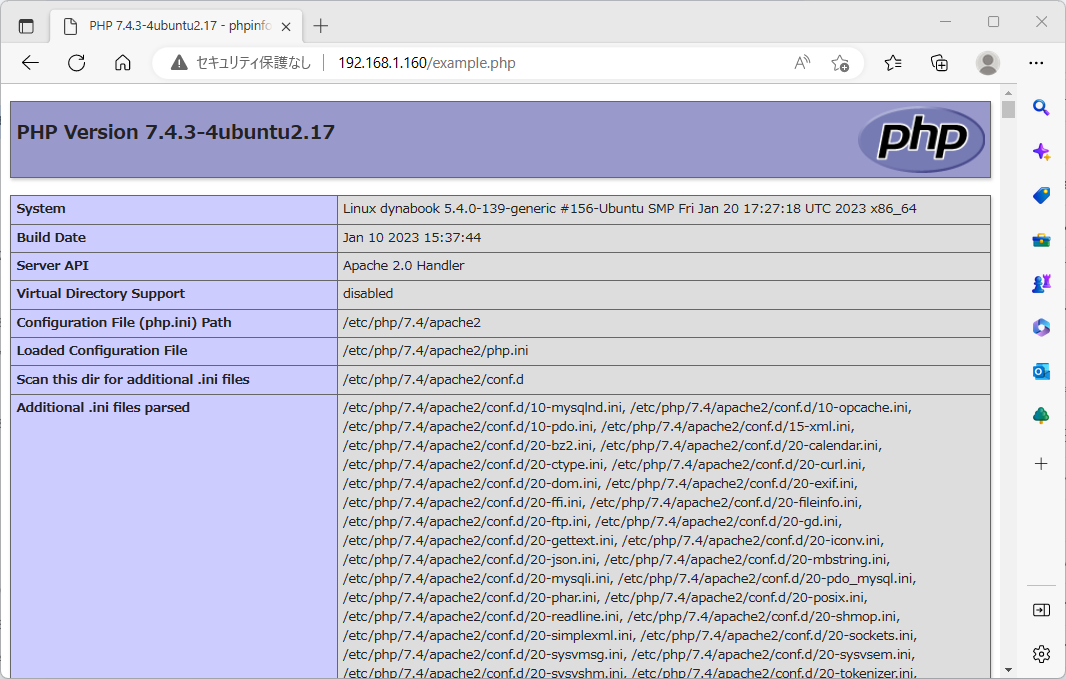
PHPの確認
$ php -vPHP 7.4.3-4ubuntu2.17 (cli) (built: Jan 10 2023 15:37:44) ( NTS )Copyright (c) The PHP GroupZend Engine v3.4.0, Copyright (c) Zend Technologieswith Zend OPcache v7.4.3-4ubuntu2.17, Copyright (c), by Zend Technologies
htmlディレクトリのパーミッションを変更
$ sudo usermod -a -G www-data <user name>$ sudo chown -R -f www-data:www-data /var/www/html$ sudo chmod -R g+w /var/www/html
logoutしてloginしなおす
テスト用のPHPファイルを作成
$ nano /var/www/html/example.php
ファイルを編集
<?phpphpinfo();?>
テスト用PHPの動作確認
http://<IPアドレス>/example.php
MySQLの確認
$ mysql --versionmysql Ver 8.0.32-0ubuntu0.20.04.2 for Linux on x86_64 ((Ubuntu))
MySQLのセキュリティ設定
mysql_secure_installation実行中にエラーが発生するので先にrootパスワードを設定してもく
$ sudo mysql -u root -p
パスワードなしでEnter
SQLでrootパスワードを設定
ALTER USER 'root'@'localhost' IDENTIFIED WITH mysql_native_password by '<password>';flush privileges;quit
mysql_secure_instllaionを実行
$ sudo mysql_secure_installation
Securing the MySQL server deployment.Enter password for user root:
SQLで設定した<password>を入力
VALIDATE PASSWORD COMPONENT→No
VALIDATE PASSWORD COMPONENT can be used to test passwordsand improve security. It checks the strength of passwordand allows the users to set only those passwords which aresecure enough. Would you like to setup VALIDATE PASSWORD component?Press y|Y for Yes, any other key for No: n
パスワード変更→No
Using existing password for root.Change the password for root ? ((Press y|Y for Yes, any other key for No) : nVALIDATE PASSWORD COMPONENT→No
あとはすべてYes
... skipping.By default, a MySQL installation has an anonymous user,allowing anyone to log into MySQL without having to havea user account created for them. This is intended only fortesting, and to make the installation go a bit smoother.You should remove them before moving into a productionenvironment.Remove anonymous users? (Press y|Y for Yes, any other key for No) : ySuccess.Normally, root should only be allowed to connect from'localhost'. This ensures that someone cannot guess atthe root password from the network.Disallow root login remotely? (Press y|Y for Yes, any other key for No) : ySuccess.By default, MySQL comes with a database named 'test' thatanyone can access. This is also intended only for testing,and should be removed before moving into a productionenvironment.Remove test database and access to it? (Press y|Y for Yes, any other key for No) : y- Dropping test database...Success.- Removing privileges on test database...Success.Reloading the privilege tables will ensure that all changesmade so far will take effect immediately.Reload privilege tables now? (Press y|Y for Yes, any other key for No) : ySuccess.All done!
MySQLで使うUser(root権限)を追加
$ sudo mysql -u root -pEnter password:
設定したrootパスワードを入力
CREATE DATABASE exampledb;CREATE USER '<username>'@'localhost' IDENTIFIED BY '<password>';GRANT ALL PRIVILEGES ON *.* TO '<username>'@'localhost';FLUSH PRIVILEGES;quit
phpMyAdminのインストール
php-mysqlがインストールされていることを確認
$ apt list php-mysql
パッケージのアップデート
$ sudo apt update$ sudo apt upgrade
PHPMyAdminのインストール
$ sudo apt install phpmyadmin
webサーバ→apache2を選択
dbconfig-commonで設定→Yes
phpmyadmin 用の MySQL アプリケーションパスワード:→パスワードを入力
Apacheの設定
$ sudo nano /etc/apache2/apache2.conf
最下行に次の一行を追加
Include /etc/phpmyadmin/apache.conf
Apacheを再起動
$ sudo service apache2 restart
PHPMyAdminにアクセス
http://<IPアドレス>/phpmyadmin

設定したuser、passwordでログイン

メモ
VNC
「Ubuntu Desktop (22.04/20.04) にVNCサーバ(TightVNC)をインストールする!」https://lab4ict.com/system/archives/5689
0 件のコメント:
コメントを投稿