Raspberry Piを使っていく上でのメモです。徐々に追加する予定です。
使用環境
- Raspberry Pi 3 Model B V1.2
- HDMIモニタ
- USBキーボード(無線)
- USBマウス(無線)
Raspberry Piを背面にマウントできるタイプのHDMIモニタを使用しています。
キーボードとマウスは中華製の安物ですが、USBドングル一つで無線接続できるのでUSBポートの節約になります。
ネットワークにWifiを使えば、必要なケーブルは電源用のUSBケーブル1本のみとなります。
Raspberry Pi 初期設定
OSインストール
Raspberry Pi Imagerを入手
SDカードを読み書きできるPCにRaspberry Pi Imagerをインストール。
Raspberry Pi Imagerを起動。
- OS: Raspberry Pi OS (32-bit)
- ストレージ: SDドライブを選択
- 書き込む
Raspberry PiのSDカードドライブにOSを書き込んだSDカードを挿入して起動。
SSHの設定
「スタート」→「設定」→「Raspberry Piの設定」
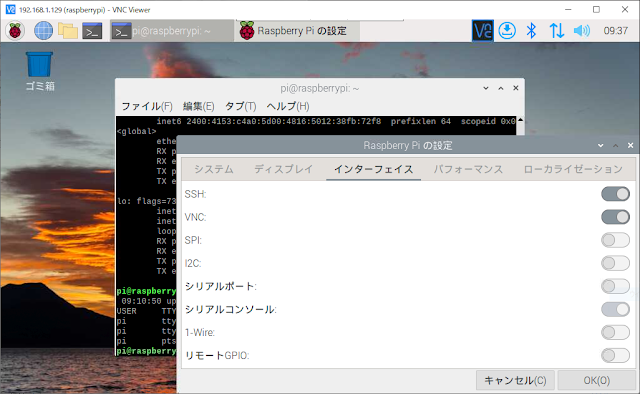
「インターフェイス」→「SSH」: ON →「OK」
VNCの設定
VNCを使うとGUIでリモート操作が可能になる。
PCのVNC ViewerでRaspberry Piに接続しているようす
「スタート」→「設定」→「Raspberry Piの設定」
「インターフェイス」→「VNC」: ON →「OK」
VNC ViewerでPCから接続。
参考
Interface 2021年9月号 104p 「特設2 第2章 ラズベリー・パイ4/3B/3B+のセットアップ」
LAMPのインストール
以下の順にインストールします。
- Apache2
- PHP7
- MySQL(MariaDB)
- phpMyAdmin
Raspberry Pi OSのバージョン
pi@raspberrypi:~ $ uname -aLinux raspberrypi 5.15.76-v7+ #1597 SMP Fri Nov 4 12:13:17 GMT 2022 armv7l GNU/Linux
Apache2のインストール
参考「Pi My Life Up: How to Setup a Raspberry Pi Apache Web Server」
パッケージのアップデート
sudo apt updatesudo apt upgrade
Apache2のインストール
sudo apt install apache2
Apache2が起動しているか確認
ps agx | grep apache
WebブラウザでApache2に接続。
http://127.0.0.1/
ユーザーpiがhtmlを編集できるようにwww-dataグループを作り所有権を変更。
sudo usermod -a -G www-data pisudo chown -R -f www-data:www-data /var/www/htmlsudo chmod -R g+w /var/www/html
ログアウトしてログインし直す。
デフォルトWebページを編集
nano /var/www/html/index.html
PHP7のインストール
PHP7のインストール
sudo apt install php7.4 libapache2-mod-php7.4 php7.4-mbstring php7.4-mysql php7.4-curl php7.4-gd php7.4-zip
テスト用のPHPファイルを作成
nano /var/www/html/example.php
nanoでテキストを編集
<?phpphpinfo();?>
動作確認
http://localhost/example.php
MySQLのインストール
参考「Pi My Life Up: Setup a Raspberry Pi MYSQL 」
パッケージのアップデート
sudo apt updatesudo apt upgrade
MySQLのインストール
sudo apt install mariadb-server
MySQLのセキュリティ設定
sudo mysql_secure_installation
すべて「Y」を選択する。
mysql_secure_installationで表示されるメッセージ (DeepLで和訳)
NOTE: RUNNING ALL PARTS OF THIS SCRIPT IS RECOMMENDED FOR ALL MariaDBSERVERS IN PRODUCTION USE! PLEASE READ EACH STEP CAREFULLY!注:このスクリプトのすべての部分を実行することは、すべてのMariaDBサーバーに推奨されます。サーバで使用することを推奨します。 各ステップを注意深く読んでください!In order to log into MariaDB to secure it, we'll need the current password for the root user. If you've just installed MariaDB, and haven't set the root password yet, you should just press enter here.MariaDBにログインしてセキュリティを確保するためには、rootユーザーの現在のパスワードが必要です。MariaDBをインストールしたばかりで、まだrootパスワードを設定していない場合は、ここでEnterキーを押すだけでよいでしょう。Enter current password for root (enter for none):OK, successfully used password, moving on...Setting the root password or using the unix_socket ensures that nobody can log into the MariaDB root user without the proper authorisation.You already have your root account protected, so you can safely answer 'n'.rootのパスワードを設定するか、unix_socketを使用することで、誰も適切な権限なしにMariaDBのrootユーザーにログインすることができないようにすることができます。あなたは既にrootアカウントを保護しているので、安全に'n'と答えることができます。Switch to unix_socket authentication [Y/n] YEnabled successfully!Reloading privilege tables..... Success!You already have your root account protected, so you can safely answer 'n'.すでにrootアカウントは保護されていますので、安心して「n」とお答えください。Change the root password? [Y/n] YNew password:Re-enter new password:Password updated successfully!Reloading privilege tables..... Success!By default, a MariaDB installation has an anonymous user, allowing anyone to log into MariaDB without having to have a user account created for them. This is intended only for testing, and to make the installation go a bit smoother. You should remove them before moving into a production environment.デフォルトでは、MariaDBのインストールには匿名ユーザーがあり、誰でもユーザーアカウントを作成することなくMariaDBにログインすることができるようになっています。 これはテスト用で、インストールを少しスムーズにするためだけです。 本番環境に移行する前に削除しておく必要があります。Remove anonymous users? [Y/n] Y... Success!Normally, root should only be allowed to connect from 'localhost'. This ensures that someone cannot guess at the root password from the network.通常、rootは「localhost」からの接続のみを許可されるべきです。 これにより、誰かがネットワークからrootのパスワードを推測することができないようにします。Disallow root login remotely? [Y/n] Y... Success!By default, MariaDB comes with a database named 'test' that anyone can access. This is also intended only for testing, and should be removed before moving into a production environment.デフォルトでは、MariaDBには誰でもアクセスできる'test'という名前のデータベースが付属しています。 これもテスト用であり、本番環境に移行する前に削除してください。Remove test database and access to it? [Y/n] Y- Dropping test database...... Success!- Removing privileges on test database...... Success!Reloading the privilege tables will ensure that all changes made so far will take effect immediately.権限テーブルを再ロードすることで、これまでに行ったすべての変更が直ちに有効になります。Reload privilege tables now? [Y/n] Y... Success!Cleaning up...All done! If you've completed all of the above steps, your MariaDB installation should now be secure.Thanks for using MariaDB!すべて完了 上記の手順がすべて完了したら、MariaDBのインストールは安全なものになるはずです。MariaDBを使用していただきありがとうございます。
MySQLサーバーへのアクセス
sudo mysql -u root -p
SQLのテスト
CREATE DATABASE exampledb;CREATE USER 'pi'@'localhost' IDENTIFIED BY 'password';GRANT ALL PRIVILEGES ON exampledb.* TO 'pi'@'localhost';FLUSH PRIVILEGES;quit;
PHP MySQLコネクタのインストール
sudo apt install php-mysql
phpMyAdminのインストール
参考「Pi My Life Up: How to Install PHPMyAdmin on the Raspberry Pi」
パッケージのアップデート
sudo apt updatesudo apt upgrade
PHPMyAdminのインストール
sudo apt install phpmyadmin
webサーバ→apache2を選択dbconfig-commonで設定しますか?→はいphpmyadmin 用の MySQL アプリケーションパスワード:→パスワードを入力
rootはPHPMyAdminで禁止されているのでユーザーを作成しすべてのアクセスを許可する。
sudo mysql -u root -p
GRANT ALL PRIVILEGES ON *.* TO 'pi'@'localhost' IDENTIFIED BY 'password' WITH GRANT OPTION;quit;
Apacheの設定
sudo nano /etc/apache2/apache2.conf
最下行に次の一行を追加
Include /etc/phpmyadmin/apache.conf
Apacheを再起動
sudo service apache2 restart
PHPMyAdminにアクセス
http://127.0.0.1/phpmyadmin
IPアドレスは次のコマンドで確認
hostname -I
Raspberry PiでphpMyAdminを実行しているようす
phpMyAdminのドキュメント


0 件のコメント:
コメントを投稿